Docker Basics
A beginners guide to Docker - containerization, images, and deployment fundamentals
As a software developer, especially an ML Engineer working in a cross-functioning team, I have come to understand the importance of creating reproducible code, that can be transferred from your dev machine to the staging or production environment with minimal required settings.
Docker is one of the most popular tools used to containerize and deploy applications. It makes building, deploying and managing applications extremely simple. It does this by using something called containers, which allow the developer to package up an application with all the parts it needs, with their own set of software, libraries and configuration file associated with them. Not only is each container isolated from other containers, they are easily reproducible entities that allow for easy abstraction during testing and deployment.
The Twelve-Factor App comes up with a general guide of basic requirements any developer who builds, deploys or manages applications which run as a service should follow. And using Docker means you’re already satisfying the majority of them.
Contents
- Why do you need docker?
- Basic Prerequisites
- Using Docker
- Docker Commands
- Containerising an application
- Further Reading
Why do you need docker?
Any fully functioning web-app is comprised of multiple constituent services. For example an end-to-end application stack might consist of the following components:
- Web server (eg. Node.js)
- Database (eg. mongoDB, sql)
- Frontend/Messaging (eg. Redis)
- Orchestration tool (eg. Ansible)
Before Docker came around, when you wanted to test your code on a different machine, you had to carefully read a big setup manual and install all the required dependencies on each machine before being able to modify or run it. Moreover, different stack require compatibility with the underlying OS and different services require different versions of dependencies to be installed, which are themselves OS dependent. Therefore, these installations clutter up your dev machine and it surely is not a reproducible environment. For example, if two systems use different versions of the same dependency, then there could be a dependency collision.
Further, when applications are updated, the associated architecture might require minor or major changes. Architecture changes require dependency/compatibility checks, and new dependencies might collide with older dependencies, which leads to what is called the compatibility matrix.
And in a cross-functioning setting like my team, where different product teams have their own dev, staging and production environments, and each product team sets their own priorities for different projects, these dependency collisions might have led to delays in deployments and the requirement of modifications to support certain dependency versions. Does upgrading the production machines to the latest distribution add value or money to the company? No. From the outset, the opposite is true: it costs time and thus, money. Thankfully, instead of frustrating code modifications, we use Docker to address all these issues.
The main purpose of Docker is to package and containerise applications, and to ship them, and run them anywhere, any number of times you want. It provides a containerised solution for developing, building and shipping an application:
- Separate libraries and dependencies for each service
- All within same VM and OS, but within isolated environments (containers)
- Easily installable with just a docker run command
DevOps in Industry
- Traditional
- Dev team develops applications
- Hands over to Ops team to deploy and manage in PRD environment
- Dev team provides a guide of information to Ops team
- Basic setup on host
- Prerequisite libraries and dependencies
- Ops team can easily face issues due to
- Incorrect/incomplete instructions from Dev team
- Mistakes in following instructions
- Dev and Ops have to work together to resolve issues
- With Docker
- Dockerfile is analogous to the Dev guide in traditional DevOps
- (Dev + Ops) work hand in hand to create the Dockerfile
- Dockerfile is used to create the image for the application
- Since this image already runs on dev system, it is supposed to work on any other host that has Docker installed
- Ops deploys the application using the image and manages PRD environment
- Dockerfile is analogous to the Dev guide in traditional DevOps
- Docker transforms Dev + Ops -> DevOps
- Every application can be containerised
- In the future, it is very probable that no one will need to install anything
- Just use docker to run a container for the image
- Stop the container when it’s no longer required
Basic Prerequisites
Before we go any forward, just in case, I will introduce some basic prerequisites in brief bullet points. If you need more information, please go wild on google.
Operating System
- Any OS consists of 2 parts: the OS Kernel and Application Softwares

- OS kernel interacts with underlying hardware and is machine-dependent eg. Linux, Windows, MacOS
- Application softwares like user interfaces, compilers, etc., differentiate the OS into different flavours. eg. ubuntu, fedora, Debian, SUSE are different flavours of the OS which uses the Linux kernel
Containers
- Completely isolated environments with their own processes for services, own network interfaces and own mounts
- Different containers share the same OS kernel
- Setting up containers can be hard since they are basically very low level code
- Not meant to host a standalone OS (unlike VMs)
- Life of a container is straightforward:
- install required dependencies over the OS kernel
- run a specific task/process/command (servers, databases, computation, analysis tasks)
- finish the task
- clean up and exit
Docker
- Docker uses LXC (Linux containers), but containers can be LXD, LXCFS, etc
- Has powerful tools for setting up containers easily for end users that abstract the low level code for setting up and managing containers
- Docker can run containers based on a different flavoured OS on any OS, as long as they share the same kernel
VMs vs Containers
-
VM
-
High resource utilization
-
Heavy size (in GBs)
-
Has to boot-up entire OS (in minutes)
-
Structure:
- Hardware Infra
  - Hypervisor (or virtual machine monitor/VMM -> similar to emulator)
    - VMs
      - Application services
      - Libraries/Dependencies
      - OS
-
-
Containers
-
Low resource utilization
-
Lightweight (in MBs)
-
Low boot-up time (in seconds)
-
Structure:
- Hardware Infra
  - OS
    - Docker installed on the OS
      - Containers
        - Applications services
        - Libraries/Dependencies
-

Using Docker
Here is a simple process for using Docker:
- Install Docker Engine on your host
- Containerised applications readily available on dockerhub (public docker registry) as
images- Most common OSes, databases, services, tools, etc are available
docker run <image name>- Runs an instance (container) of an image
- Each run command creates a new instance (new container)
- If one instance breaks, destroy it and launch new instance
Docker Image
- Package/template used to create one or more containers
- Containers are basically instances of image that are isolated and have their own environment that runs the services/processes defined in the image
- Containers based on the same image may run differently depending on the values supplied during the docker run command (see below for options)
Docker Commands
Following is a description of commonly used docker commands. Again, it is presented in a bullet-point summary
docker run
docker run <image name>- Base command to run a container instance of an image
- Looks for image
- Checks locally first
- If no local image, searches docker hub and pulls that image
- Runs container in
- attached state
- non-interactive mode
- docker run <image name>
:<image tag>- Specifies version of image to run
- eg. docker run redis:4.0 -> pulls latest 4.0 image
- Specify short or long tags as per requirement
- If tag is not supplied, docker pulls latest available image
- Specifies version of image to run
- docker run <image name>
<command>- If image does not run any service by default (eg. ubuntu), append a command so container doesn’t exit immediately
- Examples
- docker run ubuntu sleep 100
- runs an instance of ubuntu OS -> sleeps for 100s -> exits
- docker run python:3.6 cat /etc/*release*
- Runs an instance of python:3.6 image -> outputs OS information -> exits
- docker run ubuntu sleep 100
- docker run
-d<image name>- Runs instance in background (detached mode)
- So we can use the host terminal for other commands
- If -d is not specified (attached mode), need to open a new terminal or explicitly exit (ctrl + c) the container
docker attach <container_id/name>- Reattaches detached container to terminal console to view outputs
- Runs instance in background (detached mode)
- docker run
-it<image name>i: Runs container in interactive mode- Maps the STDIN of host to the docker container
- Necessary if service asks for input from the user (interactive mode)
t: Attaches host’s terminal to container- Able to use STDOUT of host to output container outputs
- Necessary if service has to show prompt to the user (in interactive mode)
docker run-p <free port on docker host>:<container’s listening port><image name>- Maps ports on localhost to listen to container ports
- Each container within the docker host has it’s own internal IP where it can be accessed
- Internal IP can only be accessed inside the docker host
- External users can use the IP of the docker host but with a free port on the docker host mapped to the container’s port
- Each container within the docker host has it’s own internal IP where it can be accessed
- eg. 80:5000 means port 80 on docker host is mapped to listen to port 5000 on the container service
- Multiple instances of applications (same or different) can be mapped to different ports on the docker host. Example:
- docker run -p 80:5000 web_app
- docker run -p 8000:5000 web_app
- docker run -p 3306:3306 mysql:2.3 (3306 is mysql’s default port)
- docker run -p 8306:3306 mysql
- Maps ports on localhost to listen to container ports
docker run-v <directory on docker host>:<container’s directory><image name>- Maps directories on localhost to the container directories
- Docker containers have their own isolated filesystems
- Services may create and store data within the containers
- eg. mysql stores databases and tables in /var/lib/mysql
- If container is deleted, this storage is deleted with the container
- Services may create and store data within the containers
- To persist the data, you need to mount an external directory on the docker host to a directory inside the container
- eg. /opt/datadir:/var/lib/mysql means /opt/datadir on docker host is mounted as /var/lib/mysql on the container
- More general command:
docker run \
--mount type=<bind or volume>,source=<directory on docker host>,target=<container’s directory> \
\<image name>
docker volume create d_v- creates persistent volume in /var/lib/docker/volumes/d_v
- d_v:/var/lib/mysql means /var/lib/docker/volumes/d_v on docker host is mounted as /var/lib/mysql on the container
docker run-e <ENV_VAR>=<value><image name>- Runs container with specified value of environment variable
- Can run multiple containers with different environment variable values in the same docker host
Container related commands
docker ps- Lists all running containers and basic information
- Container ID: random id for the container assigned by docker
- Image: name of the image used to run the container
- Command: command specified by the image
- Created: time elapsed after creation of container
- Status: how much time the container has been “up”, “exited”, etc
- Ports: ports being listened to by the instance
- Names: random name for the container assigned by docker
docker ps -a- Lists all running and previously exited containers
- Lists all running containers and basic information
docker stop <container_id/name> [container_id/name...]- Shows container name on success and exits container
docker rm <container_id/name> [container_id/name...]- Removes exited containers from storage
docker exec <container_id/name> <command>- Runs a command on a running container
- eg. docker exec hoge_hoge cat /etc/hosts
- Lists the contents of the /etc/hosts file (localhost, etc)
Image related commands
docker images- Lists all available images on host docker and basic information
- Repository: image name
- Tag: image version (default: latest)
- Image ID: docker assigned random id
- Created: when created/pulled to local
- Size: storage size
- Lists all available images on host docker and basic information
docker rmi <image name>- deletes image from local
- MUST STOP all dependent containers before removing image
docker pull <image name>- Pulls image from docker hub and stores on host
- DOES NOT run container
Monitoring commands
docker inspect <container_id/name>- Lists details of the container such as state, mounts, config, network settings, etc.
docker log <container_id/name>- View the logs written to the STDOUT of a detached container
docker history <image name>- History of image build
Containerising an application
There are three levels of understanding when we containerize an application. As a summary, think of it this way:
- You’re a developer who is happy with your code, and now wants the ops team to deploy it on the staging/production environment. You can easily send them a
detailed explanation of the build steps in English - But its the 2020s, so instead you translate that traditional “guide book” into sequential instructions in a Dockerfile. It defines how a service is run. A
docker image can be *built* from this Dockerfilethat will containerize the service you built - If your application stack consists of multiple services running parallely, you create a Dockerfile for each service or use an existing image from the docker registry. Instead of writing down run instructions for each service, you compile these instructions into a
docker-compose.yml file that puts together options for all the constituent servicesand can be used to bring up entire the application stack.
"Setup Guide Translation"
The first step to containerizing any service or application is to understand what we are containerising or what application are we creating the image for and how it is ‘built’
Traditionally the instructions would have answered the question: What would you do if you want to deploy it manually? (eg. simple web app):
1. Decide OS (eg. Ubuntu)
2. Update OS source repos (eg. apt-get update)
3. Install dependencies (eg. apt-get install) (eg. Python)
4. Install application dependencies (eg. pip install)
5. Copy source code of the application to the specified path inside the running container (eg. /opt)
6. Finally, run the service (eg. Using the flask command)
To build a docker image, we need to translate these instructions into a set of commands called the Dockerfile:
FROM Ubuntu
RUN apt-get update
RUN apt-get install python
RUN pip install flask flask-mysql
COPY . /opt/src
ENTRYPOINT FLASK_APP=/opt/src/app.py flask run
Dockerfile
A Dockerfile is a text file written in <INSTRUCTION> <argument> format that docker can understand.
Following are few of the required instructions Docker may require to build an image:
- FROM
- Defines the Base OS or Base image
- Every docker image must have exactly one FROM clause
- Examples
FROM UbuntuFROM python:3.6
- RUN
- Instructs docker to run commands on base images
- Used to install dependencies
- Example
RUN apt-get update
RUN apt-get install python
RUN pip install flask flask-mysql
- COPY
- Copies local files onto the docker image
- Places source code from local to required path inside container
- Example
COPY . /opt/src
COPY ../data /opt/data
- ENTRYPOINT
- Specifies the command that runs when image is run as a container
- Format
- Shell format ->
ENTRYPOINT command - JSON array format ->
ENTRYPOINT [“command”](preferred)
- Shell format ->
- Examples
ENTRYPOINT FLASK_APP=/opt/src/app.py flask runENTRYPOINT ["python", "app.py"] - Anything specified on the command line while using docker run will get appended to the end and run as command
- Example Dockerfile (ubuntu-sleeper)
FROM Ubuntu ENTRYPOINT [“sleep”]- docker run ubuntu-sleeper 10
- sleep 10 will be executed at container startup
- docker run ubuntu-sleeper 10
- It is recommended to supply a default param1 in case user forgets to supply it during docker run
- Always use JSON Array format for this
- Example Dockerfile (ubuntu-sleeper-default)
FROM Ubuntu ENTRYPOINT [“sleep”] CMD [“5”]- docker run ubuntu-sleeper-default -> sleeps for 5s
- docker run ubuntu-sleeper-default 10 -> overrides command and sleeps for 10s
- Example Dockerfile (ubuntu-sleeper)
- Overriding ENTRYPOINT
docker run --entrypoint command2 ubuntu-sleeper 10
- CMD
- Defines the program that will be run within the container when it starts
- Format
- Shell format ->
CMD command1 param1 - JSON array format ->
CMD [“command1”, “param1”] CMD [“command1”, “param1”]is equivalent toENTRYPOINT[“command1”] CMD[“param1”]
- Shell format ->
- Examples (base images)
# for nginx image
CMD [“nginx”]
# for ubuntu image CMD [“bash”] # Not a process -> bash shell that listens for inputs from a terminal, and exits immediately if no terminal (by default, no terminal) - Example (custom image)
- Dockerfile to run sleep 5 on ubuntu image
FROM Ubuntu
CMD sleep 5
- Dockerfile to run sleep 5 on ubuntu image
- Overriding CMD
- Overriding Param1 (use ENTRYPOINT)
- Dockerfile: FROM Ubuntu ENTRYPOINT [“sleep”]
- docker run ubuntu 10
- Overriding entire CMD
- docker run ubuntu sleep 10
- Command line
command2 param2will replace any CMD specified in Dockerfile - However, this is not recommended as it doesn’t look very good
- Command line
- docker run ubuntu sleep 10
- Overriding Param1 (use ENTRYPOINT)
- EXPOSE
- WORKDIR
Once the Dockerfile has been written, we can build the image and push it to the docker registry
docker build <root directory of Dockerfile> -t <image name>- Builds your image using the Dockerfile and makes the image locally available on the host system
- You can see the various steps involved and the result of each task
- Images are built layer by layer following the Dockerfile sequentially
- Current layer only stores changes from the previous layer
- Image size depends on last layer
- All layers are cached
- Layers cached as intermediate containers
- Helps in restarting build from the last step where the build fails
- You can see ”---> Using cache” in log for some steps
- In case new steps are added/updated to Dockerfile, rebuilding the image only needs to run the updated tasks
- Since source code is added after dependencies, updated source code does not need to reinstall dependencies
- docker build
-f <path to Dockerfile>-t <image name>- Use -f to specify path to Dockerfile
- Else need to provide context directory (root of Dockerfile)
docker push <image name>- Push to public dockerhub registry
docker-compose
The docker-compose.yml file is a set of configurations defined in yaml file format that puts together a complex application running multiple services and options specific to run them.
Once all the images have been built, and the docker-compose file is written, the entire application can be brought up using a single command:
docker-compose upSo far, there are three formats available, in which the docker-compose file can be written:
- Version 1 (default version, no need to specify)
- Very basic
- Cannot change to a different network
- attaches to default bridge network and needs to use links for communication between containers
- HAVE to mention applications in a sequential yaml format
- the order you would run them using docker run
- Version 2
- Need to specify the version at the top of the file for versions 2+ (default 1)
- Encapsulates stack information into an outer “services” dictionary
- Automatically creates a new dedicated bridge network for the application
- No need for links, since all the container names are application-specific
- Specifies a startup order using depends_on
s_2: depends_on: s_1-> s_2 will only start after s_1
- Version 3
- Latest as of today
- Structure similar to version 2
- Adds support for Docker Swarm
Following is a template for a version 3 docker-compose.yml file:
version: "3[.x]"
services:
<container name>
build:
context: <relative path of directory containing Dockerfile OR git repository url>
dockerfile: <path to alternate Dockerfile>
args:
... <env vars and values valid during build>
image: <image name>
ports:
- “<host port1>:<container port1>”
- “<host port2>:<container port2>”
volumes:
- <volume mounting name>:<container directory>
- <bind mounting path>:<container directory>
networks:
- <network name>
depends_on:
- <other container name>
deploy:
...
...
networks:
<network name>:
frontend:
backend:
...
volumes:
<volume mounting name>:
db-data:
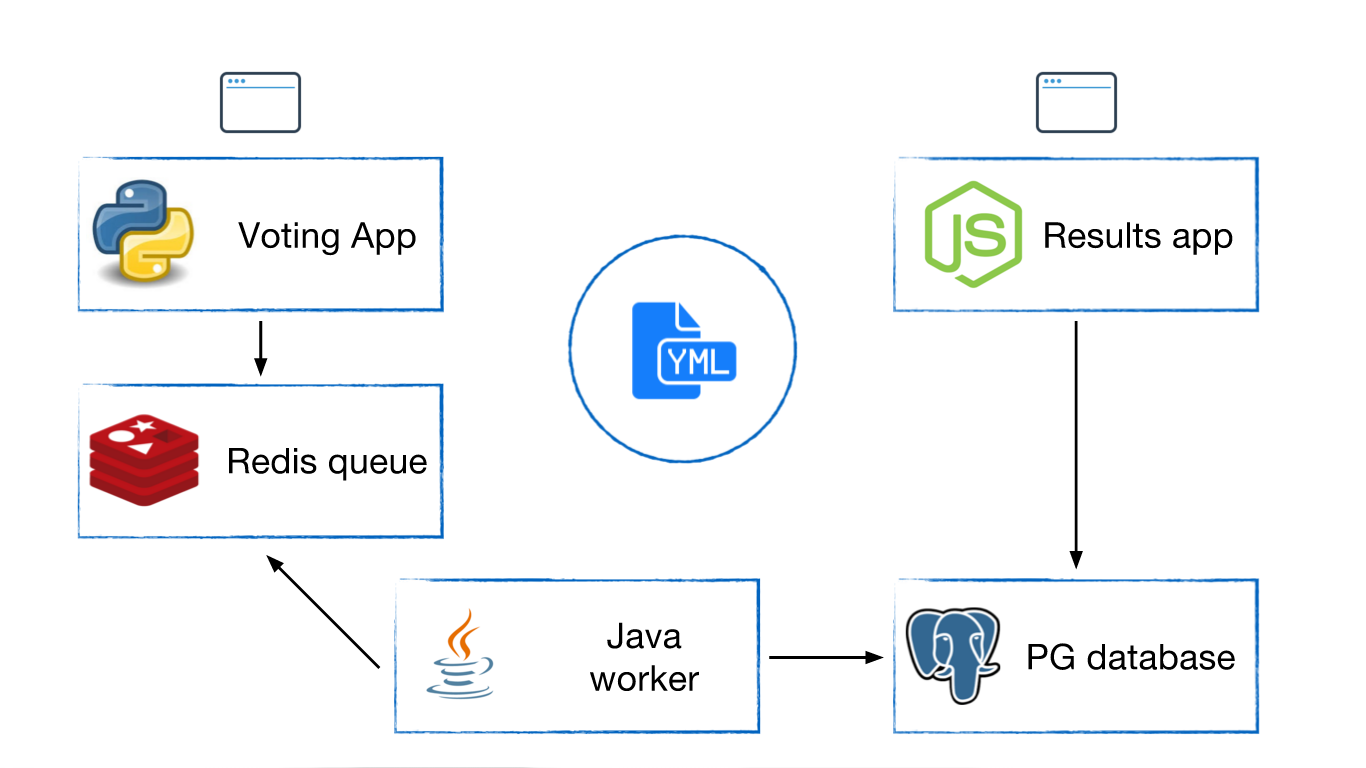
...Example Application: Setting up a Voting App
Designing and containerizing a voting app is a very popular example to illustrate docker to a beginner. The architecture looks something like this:
- A
python(flask) voting app collects votes from users - The votes are stored first in an in-memory queue implemented using
redis - A worker application based on
.NETframework then collects the queued votes - The queued votes are stored in a
PostgreSQLdatabase - A
node.jsresult app queries the database and displays the running result
Assuming we have already built the images, then to bring up the application, we can either use a series of docker run commands or use docker-compose.
The following docker run commands have to be implemented sequentially:
- First, deploy data layers
docker run -d —name=redis redisdocker run -d —name=db postgres:9.4
- Then, run application services
docker run -d —name=vote -p 5000:80 —link redis:redis voting-app- This web server has a Web UI instance running on port 80
- Publish it to port 5000 to access it from outside host
- Voting-App source code searches for a Redis service named
redis:redis = Redis(host=“redis”, db=0, socket_timeout=5) - Need to link container redis to the required service (host=“redis”)
- This web server has a Web UI instance running on port 80
docker run -d —name=result -p 5001:80 —link db:db result-app- This web server has a Web UI instance running on port 80
- Publish it to port 5001 to access it from outside host (5000 is occupied)
- Result-App source code searches for a PostgreSQL service named
db:pg.connect(‘postgres://postgres@db/postgres', function(err, client, done) {callback(err, client)} - Need to link container db to the required service (“db”)
- This web server has a Web UI instance running on port 80
- Finally, deploy the worker
docker run -d —name=worker —link redis:redis —link db:db worker- Worker source code looks for
redisanddbcontainers:Jedis redis = connectToRedis(“redis”) Connection dbConn = connectToDB(“db”) - Need to link both data layer containers to worker service
- Worker source code looks for
Now that we can deploy the application using docker run commands, it is very easy to translate the above to docker-compose.yml
version: "1" # no need to specify
redis:
  image: redis
db:
  image: postgres:9.4
vote:
  image: voting-app
  ports:
    - 5000:80
  links:
    - redis
result:
  image: result-app
  ports:
    - 5001:80
  links:
    - db
worker:
  image: worker
  links:
    - redis
    - db
version: "3"
services:
redis:
image: redis:alpine
networks:
- frontend
db:
image: postgres:9.4
volumes:
- db-data:/var/lib/postgresql/data
networks:
- backend
vote:
image: voting-app
ports:
- 5000:80
networks:
- frontend
depends_on:
- redis
result:
image: result-app
ports:
- 5001:80
networks:
- backend
depends_on:
- db
worker:
image: worker
networks:
- frontend
- backend
networks:
frontend:
backend:
volumes:
db-data:
And of course, to bring up the application, type in a single command:
docker-compose upCongratulations! Your first containerized application is up and running on your localhost.
Further Reading
Here are some topics that can be explored next, when delving deeper into how Docker works, to be even closer to the “real” environment your code runs in:
- Networks and links
- Docker Swarm
- Kubernetes (k8s)
Obviously this is far too much for this article, so let me just link to a few “distributions” of k8s: